CloudNet@ 가시다님이 진행하는 Istio In Action 책 기반 Hands-on StudyChap.2 Istio 첫걸음
- 2.1 실습환경구성 및 쿠버네티스에 Istio 설치하기
- 2.2 Istio Control Plane 알아보기
- 2.3 Serivce Mesh에 Application 배포
- 2.4 Istio Obervaility
2.1 실습환경구성 및 쿠버네티스에 Istio 설치하기
실습환경구성
kind - k8s 1.23.17
istio 1.17.8
wsl2 ubuntu 24.04 / zsh 사용
Docker Desktop
2.1 실습환경구성 및 쿠버네티스에 Istio 설치하기
Kind(Kubernetes IN Docker) 설치
- Kind란 Docker를 이용하여 Kubernetes클러스터 환경을 구성하는 도구를 뜻합니다.
- 자세한 내용은 해당 링크를 통해 확인해주시면 됩니다. Kind
- WSL 이용 시 DockerDesktop을 이용하여 Docker을 설치하는 것을 권장드립니다.
더 편하니까....
사전설치
# Docker Desktop이 설치됐다는 전제하에 진행하도록 하겠습니다.
# Kind 설치
cd ~
sudo systemctl stop apparmor && sudo systemctl disable apparmor
sudo apt update && sudo apt-get install bridge-utils net-tools jq tree unzip kubectx kubecolor wslu -y

curl -Lo ./kind https://kind.sigs.k8s.io/dl/v0.27.0/kind-linux-amd64
chmod +x ./kind
sudo mv ./kind /usr/local/bin/kind
kind --version

# Kubectl 설치
curl -LO "https://dl.k8s.io/release/$(curl -L -s https://dl.k8s.io/release/stable.txt)/bin/linux/amd64/kubectl"
chmod +x kubectl
sudo mv ./kubectl /usr/bin
sudo kubectl version --client=true

# Helm 설치
curl -s https://raw.githubusercontent.com/helm/helm/master/scripts/get-helm-3 | bash
helm version

# Source the completion
source <(kubectl completion bash)
echo 'source <(kubectl completion bash)' >> ~/.bashrc

# Alias kubectl to k
echo 'alias k=kubectl' >> ~/.bashrc
echo 'complete -o default -F __start_kubectl k' >> ~/.bashrc

# Install Kubeps & Setting PS1
git clone https://github.com/jonmosco/kube-ps1.git
echo -e "source $PWD/kube-ps1/kube-ps1.sh" >> ~/.bashrc
cat <<"EOT" >> ~/.bashrc
KUBE_PS1_SYMBOL_ENABLE=true
function get_cluster_short() {
  echo "$1" | cut -d . -f1
}
KUBE_PS1_CLUSTER_FUNCTION=get_cluster_short
KUBE_PS1_SUFFIX=') '
PS1='$(kube_ps1)'$PS1
EOT

exit
실습환경 kubernetes Cluster 배포
git clone https://github.com/AcornPublishing/istio-in-action.git
cd istio-in-action/book-source-code-master

kind create cluster --name myk8s --image kindest/node:v1.23.17 --config - <<EOF
kind: Cluster
apiVersion: kind.x-k8s.io/v1alpha4
nodes:
- role: control-plane
  extraPortMappings:
  - containerPort: 30000 # Sample Application (istio-ingrssgateway)
    hostPort: 30000
  - containerPort: 30001 # Prometheus
    hostPort: 30001
  - containerPort: 30002 # Grafana
    hostPort: 30002
  - containerPort: 30003 # Kiali
    hostPort: 30003
  - containerPort: 30004 # Tracing
    hostPort: 30004
  - containerPort: 30005 # kube-ops-view
    hostPort: 30005
  extraMounts:
  - hostPath: /Users/gasida/Downloads/istio-in-action/book-source-code-master # 각자 자신의 pwd 경로로 설정
    containerPath: /istiobook
networking:
  podSubnet: 10.10.0.0/16
  serviceSubnet: 10.200.1.0/24
EOF


# Pod 가시성 확보를 위한 도구 설치
helm repo add geek-cookbook https://geek-cookbook.github.io/charts/
helm install kube-ops-view geek-cookbook/kube-ops-view --version 1.2.2 --set service.main.type=NodePort,service.main.ports.http.nodePort=30005 --set env.TZ="Asia/Seoul" --namespace kube-system

# Mac대신 wsl은 wslview 명령어를 통해 확인
wslview "http://localhost:30005/#scale=1.5"

# Metric Server 설치
helm repo add metrics-server https://kubernetes-sigs.github.io/metrics-server/
helm install metrics-server metrics-server/metrics-server --set 'args[0]=--kubelet-insecure-tls' -n kube-system
kubectl get all -n kube-system -l app.kubernetes.io/instance=metrics-server


# Kind 노드에 기본 툴 설치
docker exec -it myk8s-control-plane sh -c 'apt update && apt install tree psmisc lsof wget bridge-utils net-tools dnsutils tcpdump ngrep iputils-ping git vim -y'


docker exec -it myk8s-control-plane bash
# 마운트 파일 확인(kind container 내부)
tree /istiobook/ -L 1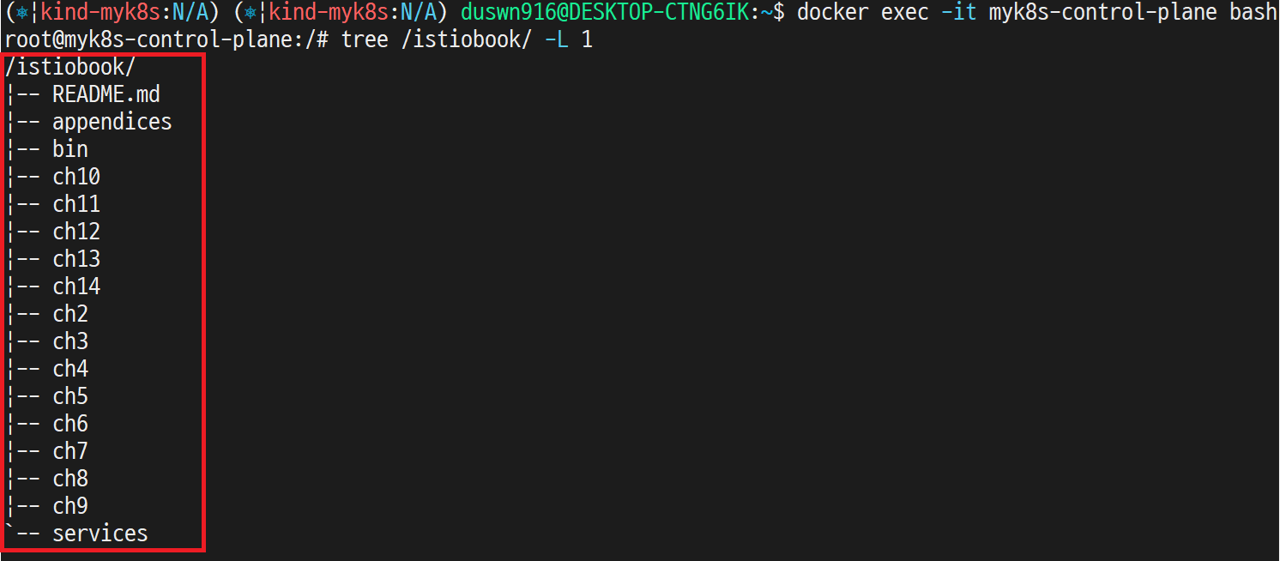
Figure 2.2 Cluster에 Repository Mount된 결과물
Istio 배포 과정
# myk8s-control-plane에서 수행(Kind로 생성한 Container 내부)
export ISTIOV=1.17.8
echo 'export ISTIOV=1.17.8' >> /root/.bashrc
curl -s -L https://istio.io/downloadIstio | ISTIO_VERSION=$ISTIOV sh -
cp istio-$ISTIOV/bin/istioctl /usr/local/bin/istioctl
istioctl version --remote=false
1.17.8

istioctl install --set profile=default -y
✔ Istio core installed
✔ Istiod installed
✔ Ingress gateways installed
✔ Installation complete                                                                                                                                                                                                                              Making this installation the default for injection and validation.

Thank you for installing Istio 1.17.  Please take a few minutes to tell us about your install/upgrade experience!  https://forms.gle/hMHGiwZHPU7UQRWe9


# 마지막 줄만 확인
istioctl verify-install
✔ Istio is installed and verified successfully


# 기본적으로 Istio의 Control Plane 요소들인 Istio-system NameSpace 에 설치됨
kubectl get po -n istio-system
NAME                                   READY   STATUS    RESTARTS        AGE
istio-ingressgateway-996bc6bb6-jc445   1/1     Running   1 (7m17s ago)   21h
istiod-7df6ffc78d-drkl4                1/1     Running   1 (7m17s ago)   21h


# 보조 도구 설치
kubectl apply -f istio-$ISTIOV/samples/addons


# 설치 결과
$ kubectl get po -n istio-system
NAME                                   READY   STATUS    RESTARTS      AGE
grafana-b854c6c8-r6h7r                 1/1     Running   0             5m37s
istio-ingressgateway-996bc6bb6-jc445   1/1     Running   1 (86m ago)   22h
istiod-7df6ffc78d-drkl4                1/1     Running   1 (86m ago)   22h
jaeger-5556cd8fcf-8wxhr                1/1     Running   0             5m37s
kiali-648847c8c4-mbgvh                 1/1     Running   0             5m37s
prometheus-7b8b9dd44c-v6zlg            2/2     Running   0             5m36s
2.2 Istio Control Plane 알아보기
Istio Control Plane이 제공해주는 기능
- 서비스간
라우팅및복원력지정 API Data Plane설정 API- Serivce Discovery
추상화 - Service Mesh
정책지정 - 인증서 발급 및 로테이션
- 워크로드 ID 할당
Telemetry수집- SideCar Injection
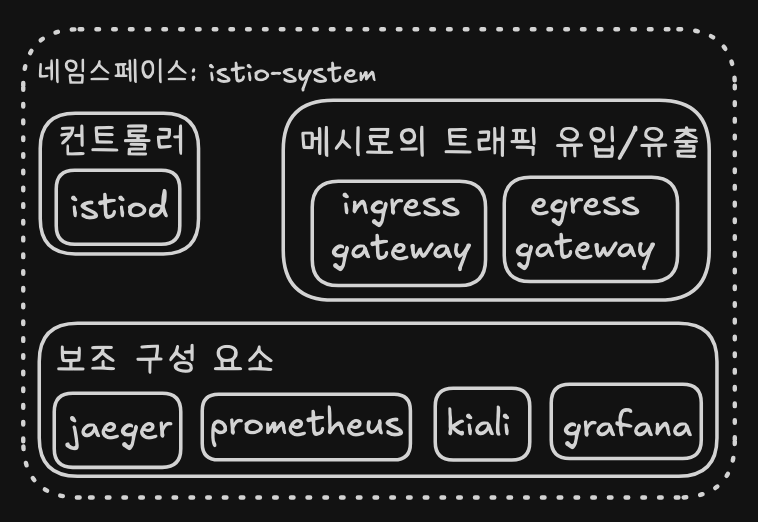
Figure 2.2 Istio Control Plane 구조
Istiod
- Istio Control Plane 에서 가장 중요한 구성 요소이며 Istio Pilot이라고 불리기도합니다.
선언형 설정을 통해 Service Mesh 구조에서 필요한 기능(Timeout, 서킷브레이커, Retry)와 같은 기능들을 사용할 수 있습니다.- 다음은 alpha 서비스가 foo-bar 헤더가 들어가있는 경우 alpha-v2 서비스로 보내는
선언형 설정의 예시입니다. apiVersion: networking.istio.io/v1alpha3 kind: VirtualService metadata: name: alpha spec: hosts: - alpha http: - match: - headers: foo-bar: exact: "v2" route: - destination: host: alpha subset: version-v2 - route: - destination: host: alpha subset: version-v1- 해당
선언형 설정이 Envoy Proxy 설정으로 변경된 예시입니다.
"domains": [
  "alpha.prod.svc.cluster.local"
],
"name": "alpha.prod.svc.cluster.local:80",
"routes": [
  {
    "match": {
      "headers": [
        {
          "name": "x-dark-launch",
          "value": "v2"
        }
      ],
      "prefix": "/"
    },
    "route": {
      "cluster": "outbound|80|v2|alpha.prod.svc.cluster.local",
      "use_websocket": false
    }
},
{
  "match": {
    "prefix": "/"
  },
  "route": {
    "cluster":
    "outbound|80|v1|alpha.prod.svc.cluster.local",
    "use_websocket": false
    }
  }
]- ID 관리
- 각 워크로드 인스턴스에 ID를 보여하고 각 서비스 호출 간 송/수신을
암호화
- 각 워크로드 인스턴스에 ID를 보여하고 각 서비스 호출 간 송/수신을
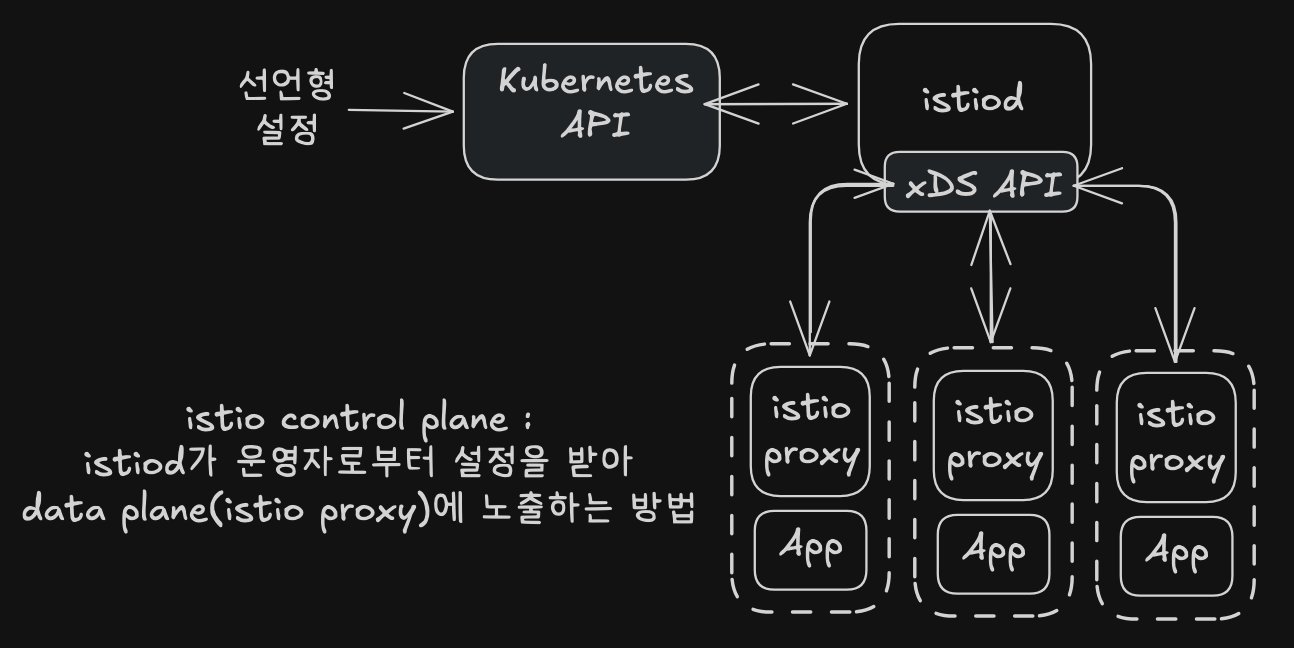
Figure 2.3 Istio에서 Service 간 구조
xDSAPI- 서비스(Listner), 엔드포인트(EndPoint), 라우팅 규칙(Route) Discovery Service를 뜻합니다.
- 워크로드 ID에 인증서를 내장하여
Istio Service Mesh에서 통신 시mTLS를 사용할 수 있습니다.
Ingress, egress Gateway
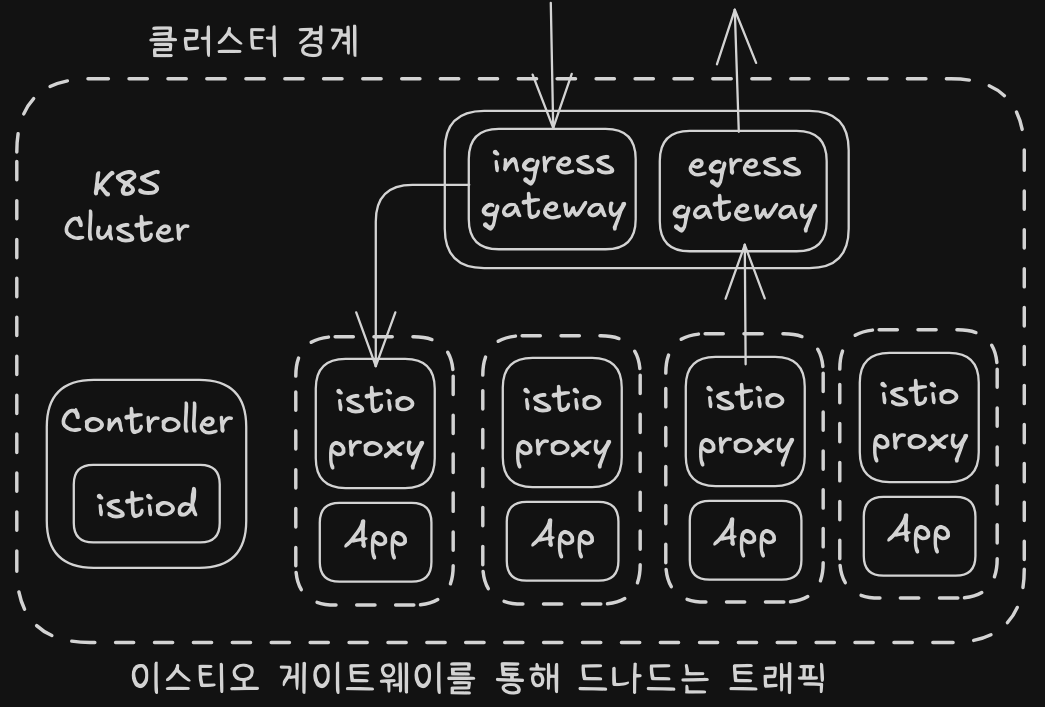
Figure 2.4 ingress, egressGateway
Data Plane에 속해있지만, 가장최상단에 위치해있는 Envoy Proxy 입니다.Istio Service Mesh환경에서 트래픽의 흐름을 파악 할 수 있는 중요한 구성 요소 입니다.
이미지를 제공해주신 김도경님 감사드립니다!!
2.3 Serivce Mesh에 Application 배포
# myk8s-control-plane Container 에서 실행
 kubectl create ns istioinaction

# namespace에 레이블을 추가아여 istiod를 통해 namepsace의 pod spec에 자동으로 sidecar 설정을 주입
 kubectl label namespace istioinaction istio-injection=enabled
 kubectl get ns --show-labels

cd istiobook

kubectl apply -f services/catalog/kubernetes/catalog.yaml -n istioinaction

# Result
serviceaccount/catalog created
service/catalog created
deployment.apps/catalog created

kubectl apply -f services/webapp/kubernetes/webapp.yaml -n istioinaction

# Result
serviceaccount/webapp created
service/webapp created
deployment.apps/webapp created


kubectl get pod -n istioinaction

# Result
NAME                     READY   STATUS    RESTARTS   AGE
catalog-6cf4b97d-8x6kj   2/2     Running   0          22s
webapp-7685bcb84-flvd2   2/2     Running   0          17s


# 접속 테스트용 netshoot 파드 생성
root@myk8s-control-plane:/istiobook# cat <<EOF | kubectl apply -f -
apiVersion: v1
kind: Pod
metadata:
  name: netshoot
spec:
  containers:
  - name: netshoot
    image: nicolaka/netshoot
    command: ["tail"]
    args: ["-f", "/dev/null"]
  terminationGracePeriodSeconds: 0
EOF

# catalog 접속 확인
kubectl exec -it netshoot -- curl -s http://catalog.istioinaction/items/1 | jq

# Result

{
  "id": 1,
  "color": "amber",
  "department": "Eyewear",
  "name": "Elinor Glasses",
  "price": "282.00"
}r


# webapp 접속 확인
# webapp은 다른 서비스의 데이터를 집계하여 표연하는 서비스 입니다.
kubectl exec -it netshoot -- curl -s http://webapp.istioinaction/api/catalog/items/1 | jq


# Result
{
  "id": 1,
  "color": "amber",
  "department": "Eyewear",
  "name": "Elinor Glasses",
  "price": "282.00"
}
2.4 Istio Obervaility
Istio Service Mesh에서 주요 Mertic 수집 방법
- 앞에서 설명한 보조 구성 요소 Jaeger, Proemtheus, kiali, grafana를 통해 Application의 Telemetry 요소들을 이용하여 Network Metirc을 수집 할 수 있습니다.
실습
# myk8s-control-plane Container 에서 실행

istioctl proxy-status

# Result
NAME                                                  CLUSTER        CDS        LDS        EDS        RDS          ECDS         ISTIOD                      VERSION
catalog-6cf4b97d-8x6kj.istioinaction                  Kubernetes     SYNCED     SYNCED     SYNCED     SYNCED       NOT SENT     istiod-7df6ffc78d-drkl4     1.17.8
istio-ingressgateway-996bc6bb6-jc445.istio-system     Kubernetes     SYNCED     SYNCED     SYNCED     NOT SENT     NOT SENT     istiod-7df6ffc78d-drkl4     1.17.8
webapp-7685bcb84-flvd2.istioinaction                  Kubernetes     SYNCED     SYNCED     SYNCED     SYNCED       NOT SENT     istiod-7df6ffc78d-drkl4     1.17.8

cd /istiobook


cat <<EOF | kubectl -n istioinaction apply -f -
apiVersion: networking.istio.io/v1alpha3
kind: Gateway
metadata:
  name: outfitters-gateway
  namespace: istioinaction
spec:
  selector:
    istio: ingressgateway # use istio default controller
  servers:
  - port:
      number: 80
      name: http
      protocol: HTTP
    hosts:
    - "*"
---
apiVersion: networking.istio.io/v1alpha3
kind: VirtualService
metadata:
  name: webapp-virtualservice
  namespace: istioinaction
spec:
  hosts:
  - "*"
  gateways:
  - outfitters-gateway
  http:
  - route:
    - destination:
        host: webapp
        port:
          number: 80
EOF

# Resut
gateway.networking.istio.io/outfitters-gateway created
virtualservice.networking.istio.io/webapp-virtualservice created


# Istio ingress gateway pod와 webapp pod 정보 파악
# Resut
istioctl proxy-status
NAME                                                  CLUSTER        CDS        LDS        EDS        RDS        ECDS         ISTIOD                      VERSION
catalog-6cf4b97d-8x6kj.istioinaction                  Kubernetes     SYNCED     SYNCED     SYNCED     SYNCED     NOT SENT     istiod-7df6ffc78d-drkl4     1.17.8
istio-ingressgateway-996bc6bb6-jc445.istio-system     Kubernetes     SYNCED     SYNCED     SYNCED     SYNCED     NOT SENT     istiod-7df6ffc78d-drkl4     1.17.8
webapp-7685bcb84-flvd2.istioinaction                  Kubernetes     SYNCED     SYNCED     SYNCED     SYNCED     NOT SENT     istiod-7df6ffc78d-drkl4     1.17.8


ISTIOIGW=istio-ingressgateway-996bc6bb6-jc445.istio-system
WEBAPP=webapp-7685bcb84-flvd2.istioinaction


istioctl proxy-config all $ISTIOIGW
istioctl proxy-config all $WEBAPP
istioctl proxy-config listener $ISTIOIGW
istioctl proxy-config route $ISTIOIGW
istioctl proxy-config cluster $ISTIOIGW
istioctl proxy-config endpoint $ISTIOIGW
istioctl proxy-config log $ISTIOIGW

istioctl proxy-config listener $WEBAPP
istioctl proxy-config route $WEBAPP
istioctl proxy-config cluster $WEBAPP
istioctl proxy-config endpoint $WEBAPP
istioctl proxy-config log $WEBAPP

# envoy 가 사용하고 있는 Gateway 인증서 정보 확인
istioctl proxy-config secret $ISTIOIGW

# Result
RESOURCE NAME     TYPE           STATUS     VALID CERT     SERIAL NUMBER                               NOT AFTER                NOT BEFORE
default           Cert Chain     ACTIVE     true           307343909600089355884500392768635162560     2025-04-13T00:10:04Z     2025-04-12T00:08:04Z
ROOTCA            CA             ACTIVE     true           296469614872167451218769346571267180763     2035-04-08T15:22:16Z     2025-04-10T15:22:16Z


# envoy 가 사용하고 있는 WebApp 인증서 정보 확인
istioctl proxy-config secret $WEBAPP

# Result
RESOURCE NAME     TYPE           STATUS     VALID CERT     SERIAL NUMBER                               NOT AFTER                NOT BEFORE
default           Cert Chain     ACTIVE     true           246814649262182386325714582580139912750     2025-04-13T00:10:01Z     2025-04-12T00:08:01Z
ROOTCA            CA             ACTIVE     true           296469614872167451218769346571267180763     2035-04-08T15:22:16Z     2025-04-10T15:22:16Z

# Ingress Gateway의 Routing 정보 확연
istioctl proxy-config routes deploy/istio-ingressgateway.istio-system

# Result
NAME          DOMAINS     MATCH                  VIRTUAL SERVICE
http.8080     *           /*                     webapp-virtualservice.istioinaction
              *           /healthz/ready*
              *           /stats/prometheus*

# 다시 Host 세션으로 복귀
exit


# istio-ingressgateway 서비스 NodePort 변경 및 nodeport 30000로 지정 변경
kubectl patch svc -n istio-system istio-ingressgateway -p '{"spec": {"type": "NodePort", "ports": [{"port": 80, "targetPort": 8080, "nodePort": 30000}]}}'

# Result
service/istio-ingressgateway patched

# istio-ingressgateway 서비스 externalTrafficPolicy 설정 : ClientIP 수집 확인
kubectl patch svc -n istio-system istio-ingressgateway -p '{"spec":{"externalTrafficPolicy": "Local"}}'

#Result
service/istio-ingressgateway patched


# Krew를 설치하고 stern Plug-in모듈이 없는 경우 설치

kubectl krew install stern

# Application 로그 확인
kubectl stern -l app=webapp -n istioinaction
kubectl stern -l app=catalog -n istioinaction

# Test를 위한 Web Application 반복 수행(다른세션 2개 생성 후 해당 명령어 각각 수행)
while true; do curl -s http://127.0.0.1:30000/api/catalog -I | head -n 1 ; date "+%Y-%m-%d %H:%M:%S" ; sleep 0.5; echo; done
while true; do curl -s http://127.0.0.1:30000/api/catalog/items/1 ; sleep 1; echo; done

# 기존 세션 복귀 후 NodePort 변경 및 nodeport 30001~30003으로 변경 : prometheus(30001), grafana(30002), kiali(30003), tracing(30004)
kubectl patch svc -n istio-system prometheus -p '{"spec": {"type": "NodePort", "ports": [{"port": 9090, "targetPort": 9090, "nodePort": 30001}]}}'
kubectl patch svc -n istio-system grafana -p '{"spec": {"type": "NodePort", "ports": [{"port": 3000, "targetPort": 3000, "nodePort": 30002}]}}'
kubectl patch svc -n istio-system kiali -p '{"spec": {"type": "NodePort", "ports": [{"port": 20001, "targetPort": 20001, "nodePort": 30003}]}}'
kubectl patch svc -n istio-system tracing -p '{"spec": {"type": "NodePort", "ports": [{"port": 80, "targetPort": 16686, "nodePort": 30004}]}}'


# Prometheus 접속 : envoy, istio 메트릭 확인
wslview http://127.0.0.1:30001

# Grafana 접속
wslview http://127.0.0.1:30002

# Kiali 접속
wslview http://127.0.0.1:30003

# tracing 접속 : 예거 트레이싱 대시보드
wslview http://127.0.0.1:30004
설치된 Grafana 대시보드를 통해 확인


- 좌측 돋보기 모양 클릭 > Search Dashboards 클릭
- 우측 화살표모양 클릭 > Istio Service DashBoard 클릭
- Figure 2.5 설치된 Grafana를 통해 Istio Metric 방법*
Jaeger를 통한 트레이싱 및 스팬 정보 확인
- istio Service Proxy가 서비스 간
트레이싱 ID와MateaData를 전파하고, 트레이싱 엔진에 트레이싱 스팬 정보를 보냅니다. - MetaData는 주로 HTTP 헤더의 집학으로 구성되어있으며, 헤더를 이용하여 서비스간 연관지는 것은 Application의 관심사입니다.


- 좌측 Service에서 istio-ingressgateway.istio-system 클릭 > Find Traces 클릭 후 우측 Trace클릭
- Figure 2.6 설치된 Jaeger를 통해 Istio Metric 확인 방법*
Kiali를 통한 트래픽의 흐름 시각화 정보 확인
- Prometheus와 Jaeger의 정보를 통해 트래픽의 흐름을 시각화 해주는 도구입니다.


- 좌측 Graph 클릭 > Name Space Istioinaction 체크 > Display항목에서
Traffic Distribution과Traffic Animation,Service nods,Security체크
Figure 2.7 설치된 Kiali를 통해 Istio Metric 확인 방법
Istio 복원력 확인
Case) WebAPP -> Catalog 서비스 호출 시 500 에러가 발생한 경우
# Host 세션에서 kind Cluster 접속
docker exec -it myk8s-control-plane bash


# Default Namespace를 istioinaction으로 변경
kubectl config set-context $(kubectl config current-context) --namespace=istioinaction


cd /istiobook/bin/
500 에러 발생
./chaos.sh 500 100
Figure 2.8 500에러가 100% 발생 시의 Kiali, Grafana
500에러를 50%확률로 발생
./chaos.sh 500 50
Figure 2.8 500에러가 50% 발생 시의 Grafana
복원력 기능을 위해 Application을 수정하는 것이 아닌 Istio 수정
cat <<EOF | kubectl -n istioinaction apply -f -
apiVersion: networking.istio.io/v1alpha3
kind: VirtualService
metadata:
  name: catalog
spec:
  hosts:
  - catalog
  http:
  - route:
    - destination:
        host: catalog
    retries:
      attempts: 3 # 500에러 발생시 3트까지 수행
      retryOn: 5xx
      perTryTimeout: 2s
EOF

#Result
virtualservice.networking.istio.io/catalog created

kubectl get vs -n istioinaction

#Result
NAME                    GATEWAYS                 HOSTS         AGE
catalog                                          ["catalog"]   11s
webapp-virtualservice   ["outfitters-gateway"]   ["*"]         12h
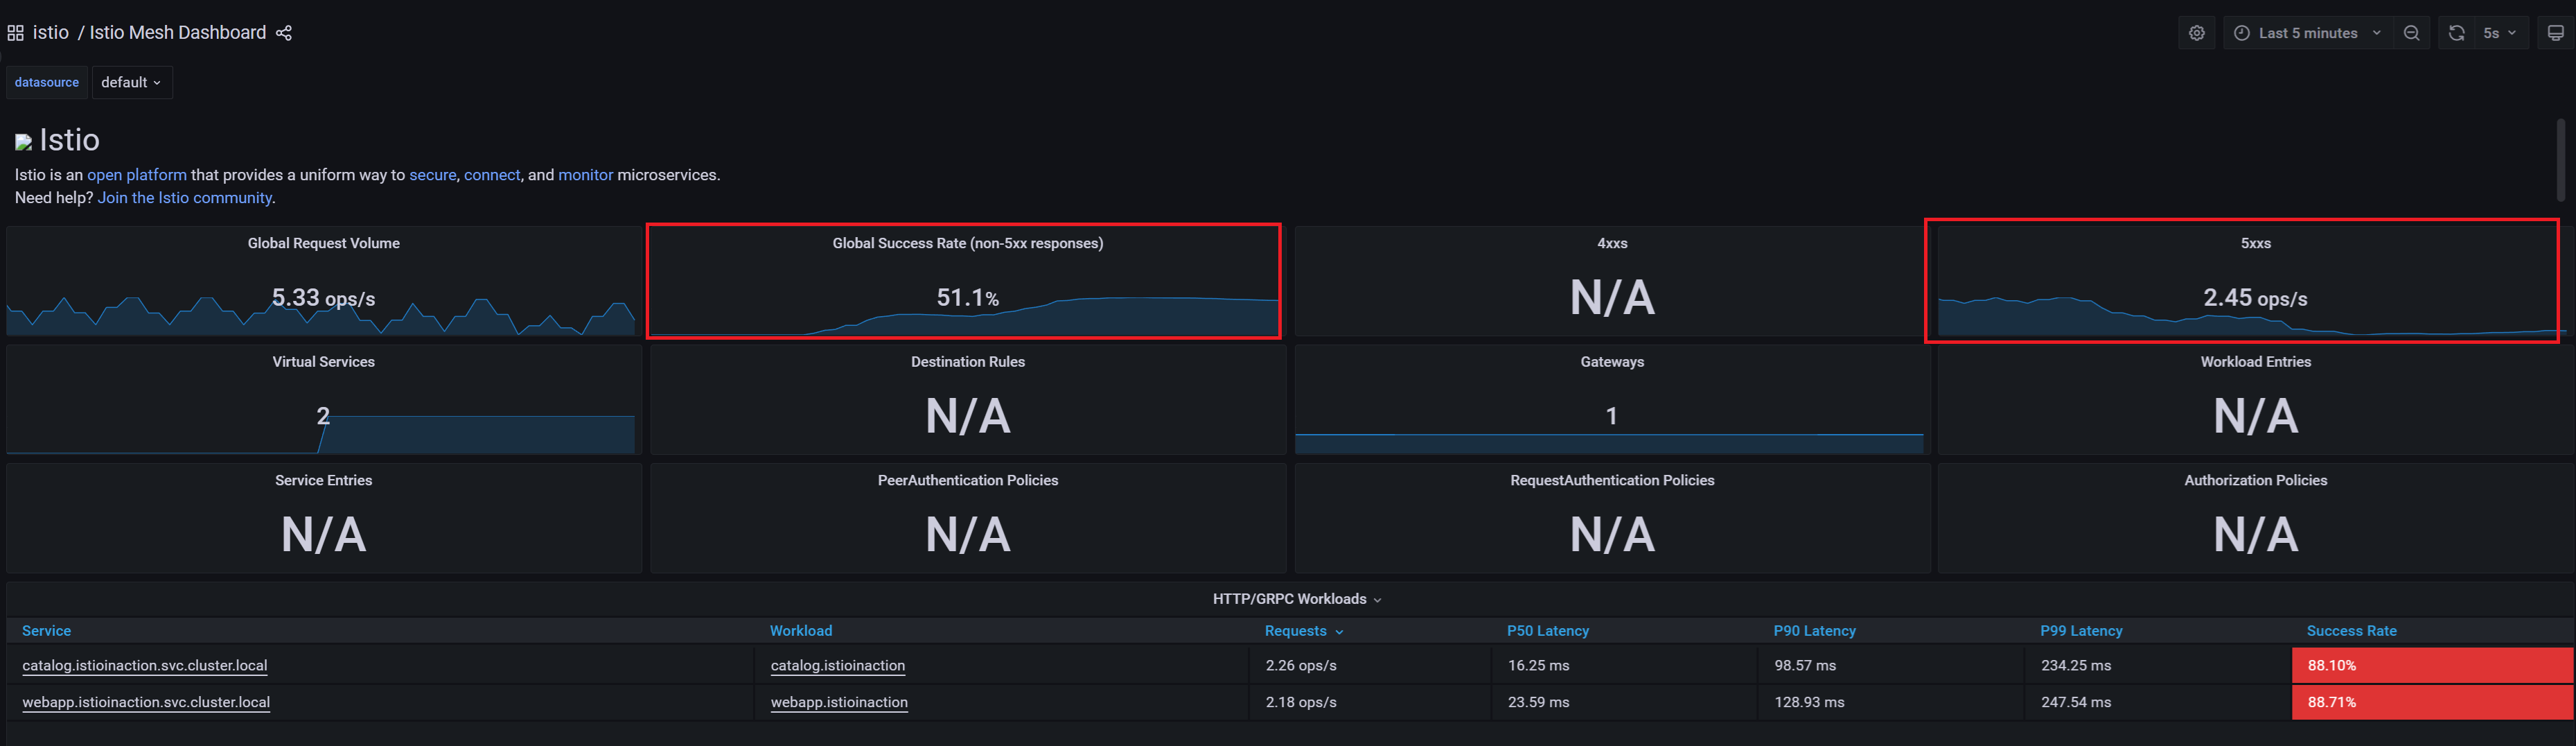
Figure 2.10 복원력 설정 적용 시의 Kiali, Grafana
특정 조건에서 트래픽을 v2로 라우팅하도록 설정하는 기능
# catalog v2 배포
cat <<EOF | kubectl -n istioinaction apply -f -
apiVersion: apps/v1
kind: Deployment
metadata:
  labels:
    app: catalog
    version: v2
  name: catalog-v2
spec:
  replicas: 1
  selector:
    matchLabels:
      app: catalog
      version: v2
  template:
    metadata:
      labels:
        app: catalog
        version: v2
    spec:
      containers:
      - env:
        - name: KUBERNETES_NAMESPACE
          valueFrom:
            fieldRef:
              fieldPath: metadata.namespace
        - name: SHOW_IMAGE
          value: "true"
        image: istioinaction/catalog:latest
        imagePullPolicy: IfNotPresent
        name: catalog
        ports:
        - containerPort: 3000
          name: http
          protocol: TCP
        securityContext:
          privileged: false
EOF
# 500에러 발생 끄기
./chaos.sh 500 delete
# Host 세션에서 수행 중인 무한호출 끄기# label을 적용하여 Destination 설정
cat <<EOF | kubectl -n istioinaction apply -f -
apiVersion: networking.istio.io/v1alpha3
kind: DestinationRule
metadata:
name: catalog
spec:
host: catalog
subsets:
- name: version-v1
labels:
version: v1
- name: version-v2
labels:
version: v2
EOF# 반복호출 재수행(세션 복제 후 수행)
while true; do curl -s http://127.0.0.1:30000/api/catalog | jq; date "+%Y-%m-%d %H:%M:%S" ; sleep 1; echo; done
Figure 2.11 v1,v2 트래픽 적용 설정의 Kiali
# v1 라우팅 VS 수정(업데이트)
cat <<EOF | kubectl -n istioinaction apply -f -
apiVersion: networking.istio.io/v1alpha3
kind: VirtualService
metadata:
  name: catalog
spec:
  hosts:
  - catalog
  http:
  - route:
    - destination:
        host: catalog
        subset: version-v1
EOF

# Result
virtualservice.networking.istio.io/catalog configured

# 라우팅 Virtual Service 수정 x-dark-launch헤더가 v2인경우 v2로 라우팅
cat <<EOF | kubectl -n istioinaction apply -f -
apiVersion: networking.istio.io/v1alpha3
kind: VirtualService
metadata:
  name: catalog
spec:
  hosts:
  - catalog
  http:
  - match:
    - headers:
        x-dark-launch:
          exact: "v2"
    route:
    - destination:
        host: catalog
        subset: version-v2
  - route:
    - destination:
        host: catalog
        subset: version-v1
EOF

# Result
virtualservice.networking.istio.io/catalog configured
# 새로운 세션에서 수행(v1)
while true; do curl -s http://127.0.0.1:30000/api/catalog | jq; date "+%Y-%m-%d %H:%M:%S" ; sleep 1; echo; done
# 새로운 세션에서 수행(v2)
while true; do curl -s http://127.0.0.1:30000/api/catalog -H "x-dark-launch: v2" | jq; date "+%Y-%m-%d %H:%M:%S" ; sleep 1; echo; doneFigure 2.12 v1 트래픽 Kiali
Figure 2.13 v2 트래픽 Kiali
실습종료
kind delete cluster --name myk8s'DevOps > Study' 카테고리의 다른 글
| Istio Hands-on Study [1기] [2주차 1/2] Istio의 Data Plane Envoy Proxy (0) | 2025.04.19 |
|---|---|
| Istio Hands-on Study [1기] [1주차 연습과제] Istio Proxy 를 K8S Native Sidecars 로 구성 및 사용 (0) | 2025.04.16 |
| Istio Hands-on Study [1기] [1주차 연습과제] Kubernetes Gateway API (0) | 2025.04.16 |
| Istio Hands-on Study [1기] [1주차 연습과제] Sail Operator (0) | 2025.04.16 |
| Istio Hands-on Study [1기] [1주차 1/2] Serivce Mesh 소개하기 (0) | 2025.04.12 |